I always like to experiment with the hottest new frameworks and libraries in Python. A few technologies that I have found interesting lately are:
- FastAPI - A framework for building APIs based on pydantic.
- MongoDB - A NoSQL database.
- Beanie - An “object document mapper” (ODM) that allows you to model your MongoDB using python.
This blog post provides a working example of a webapp that uses all three technologies 🎉!
Motivation
I wanted to create a web app that uses FastAPI, MongoDB, and Beanie. But, I could not find any really good examples that used all three. This blog post is to demonstrate what I learned while building a web app using these three tools. I have tried to make the example simple enough that it can easily be implemented by others, but also complex enough that it is interesting, and could be used to bootstrap a real project for someone else.
All of the code can be found on GitHub: https://github.com/SamEdwardes/personal-blog/tree/main/blog/2022-03-18-fastapi-beanie-one-page. You can also download the code as zip file using this link from DownGit.
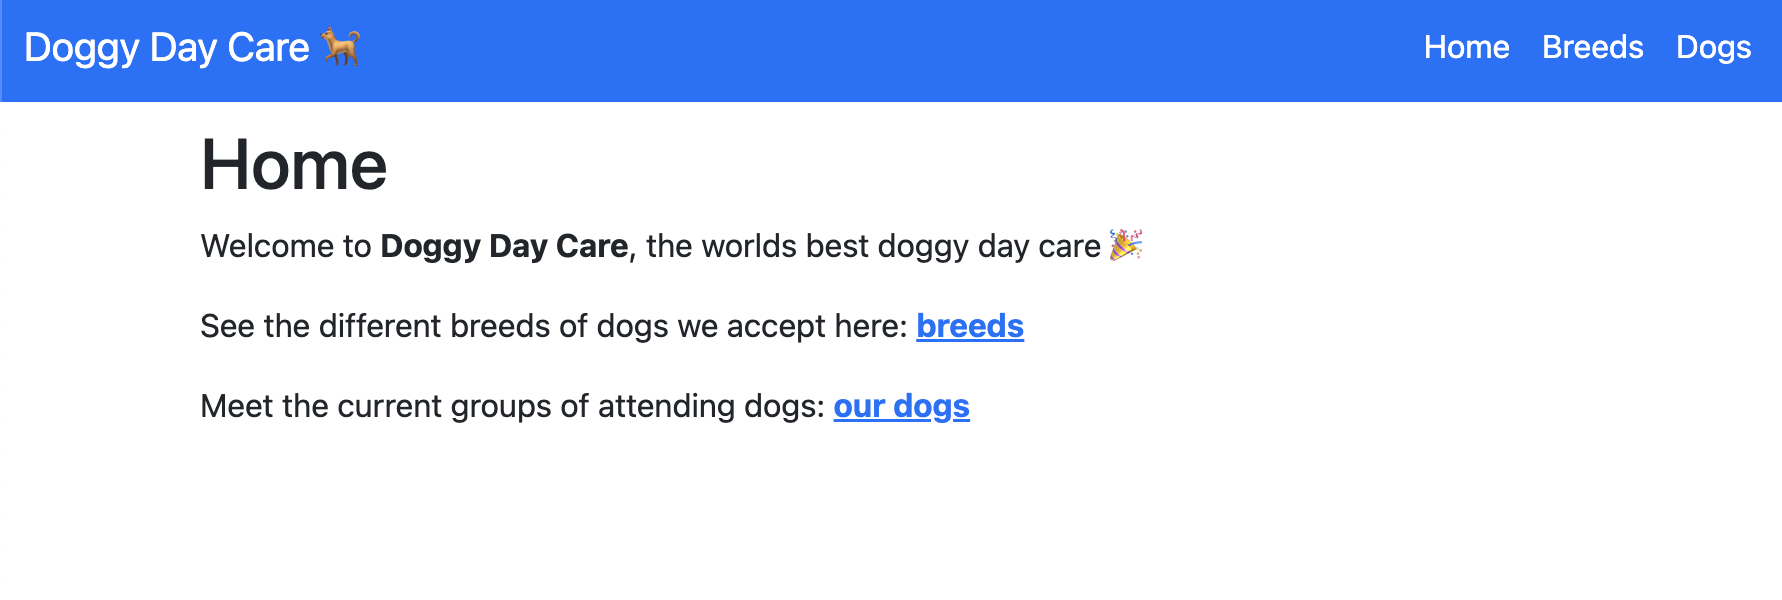
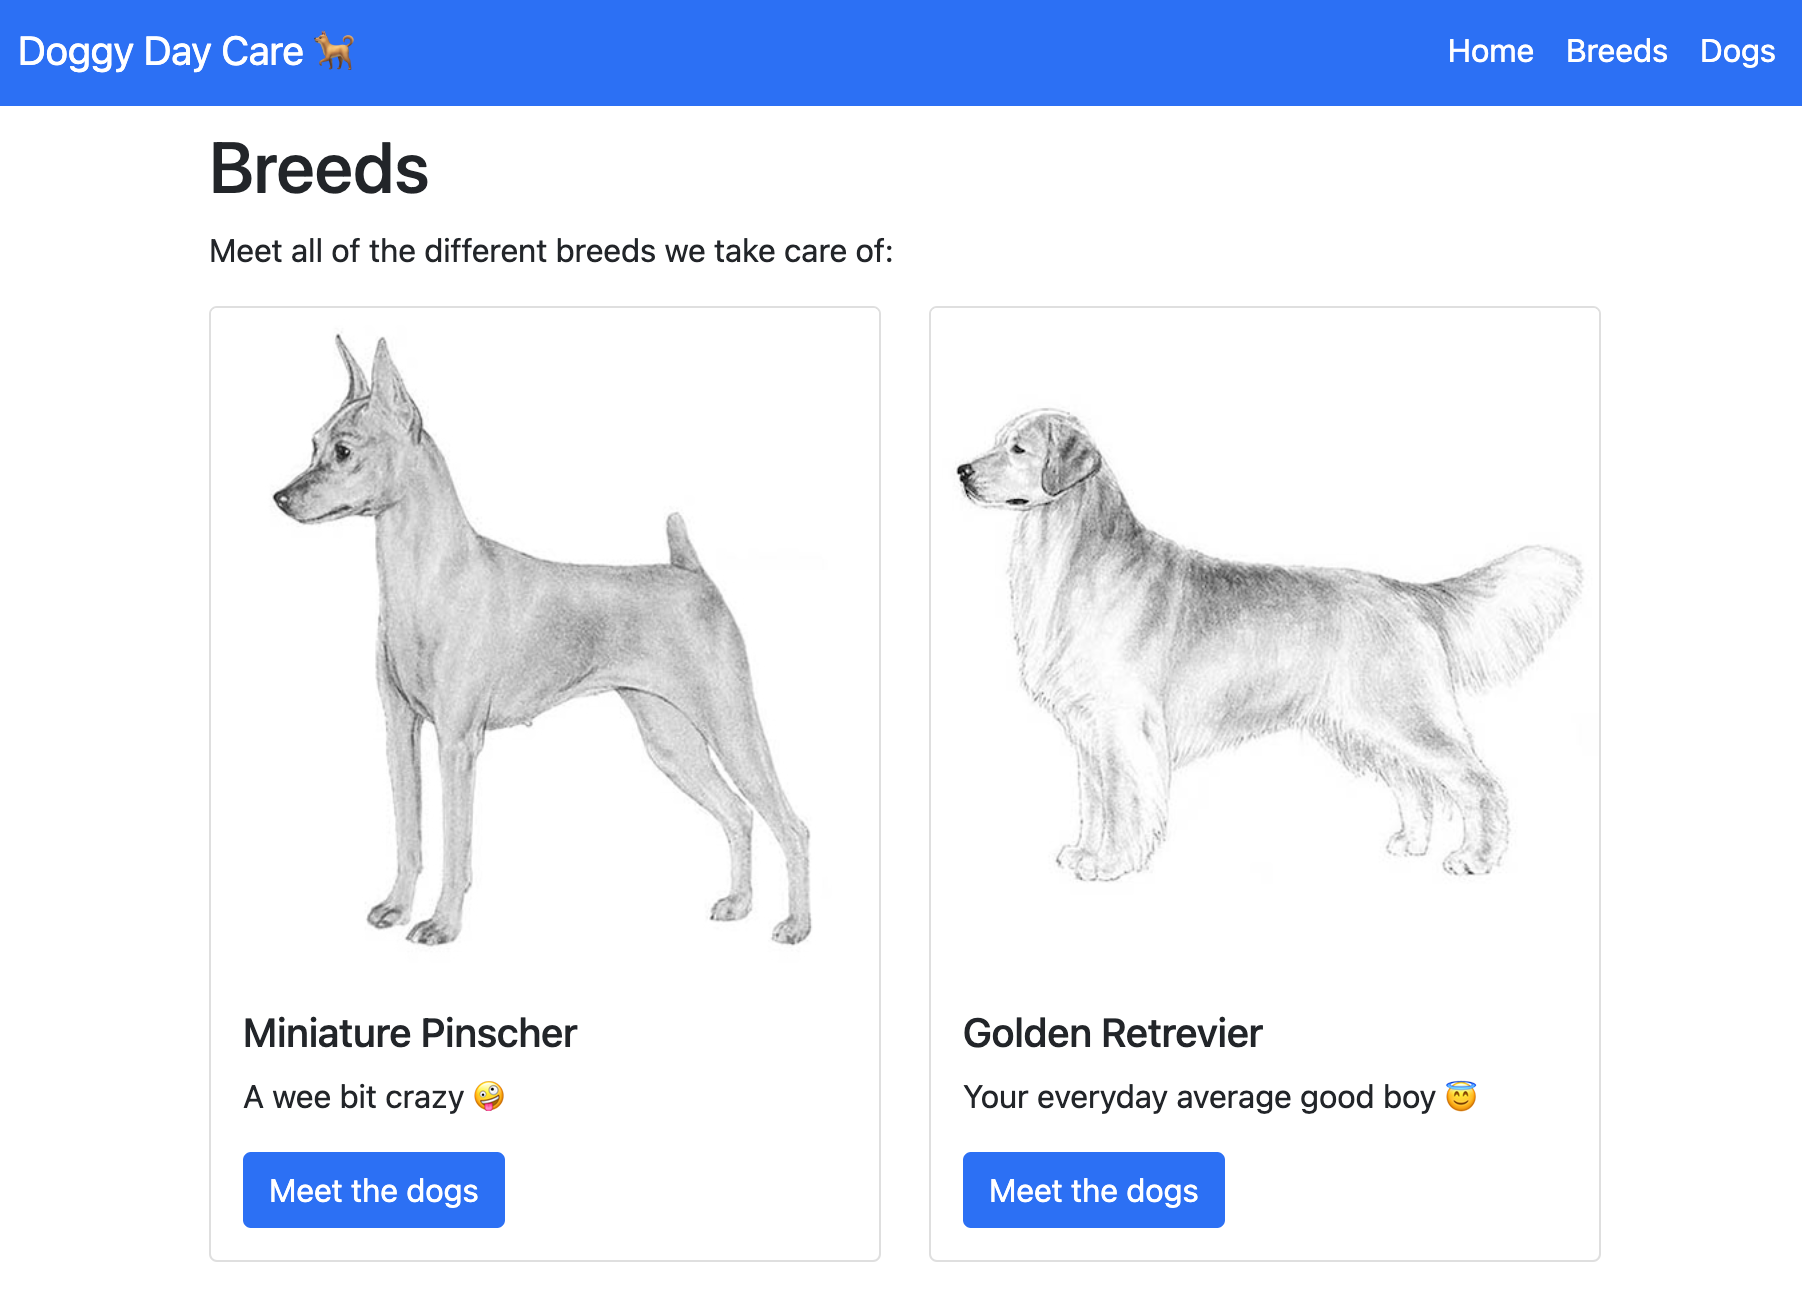
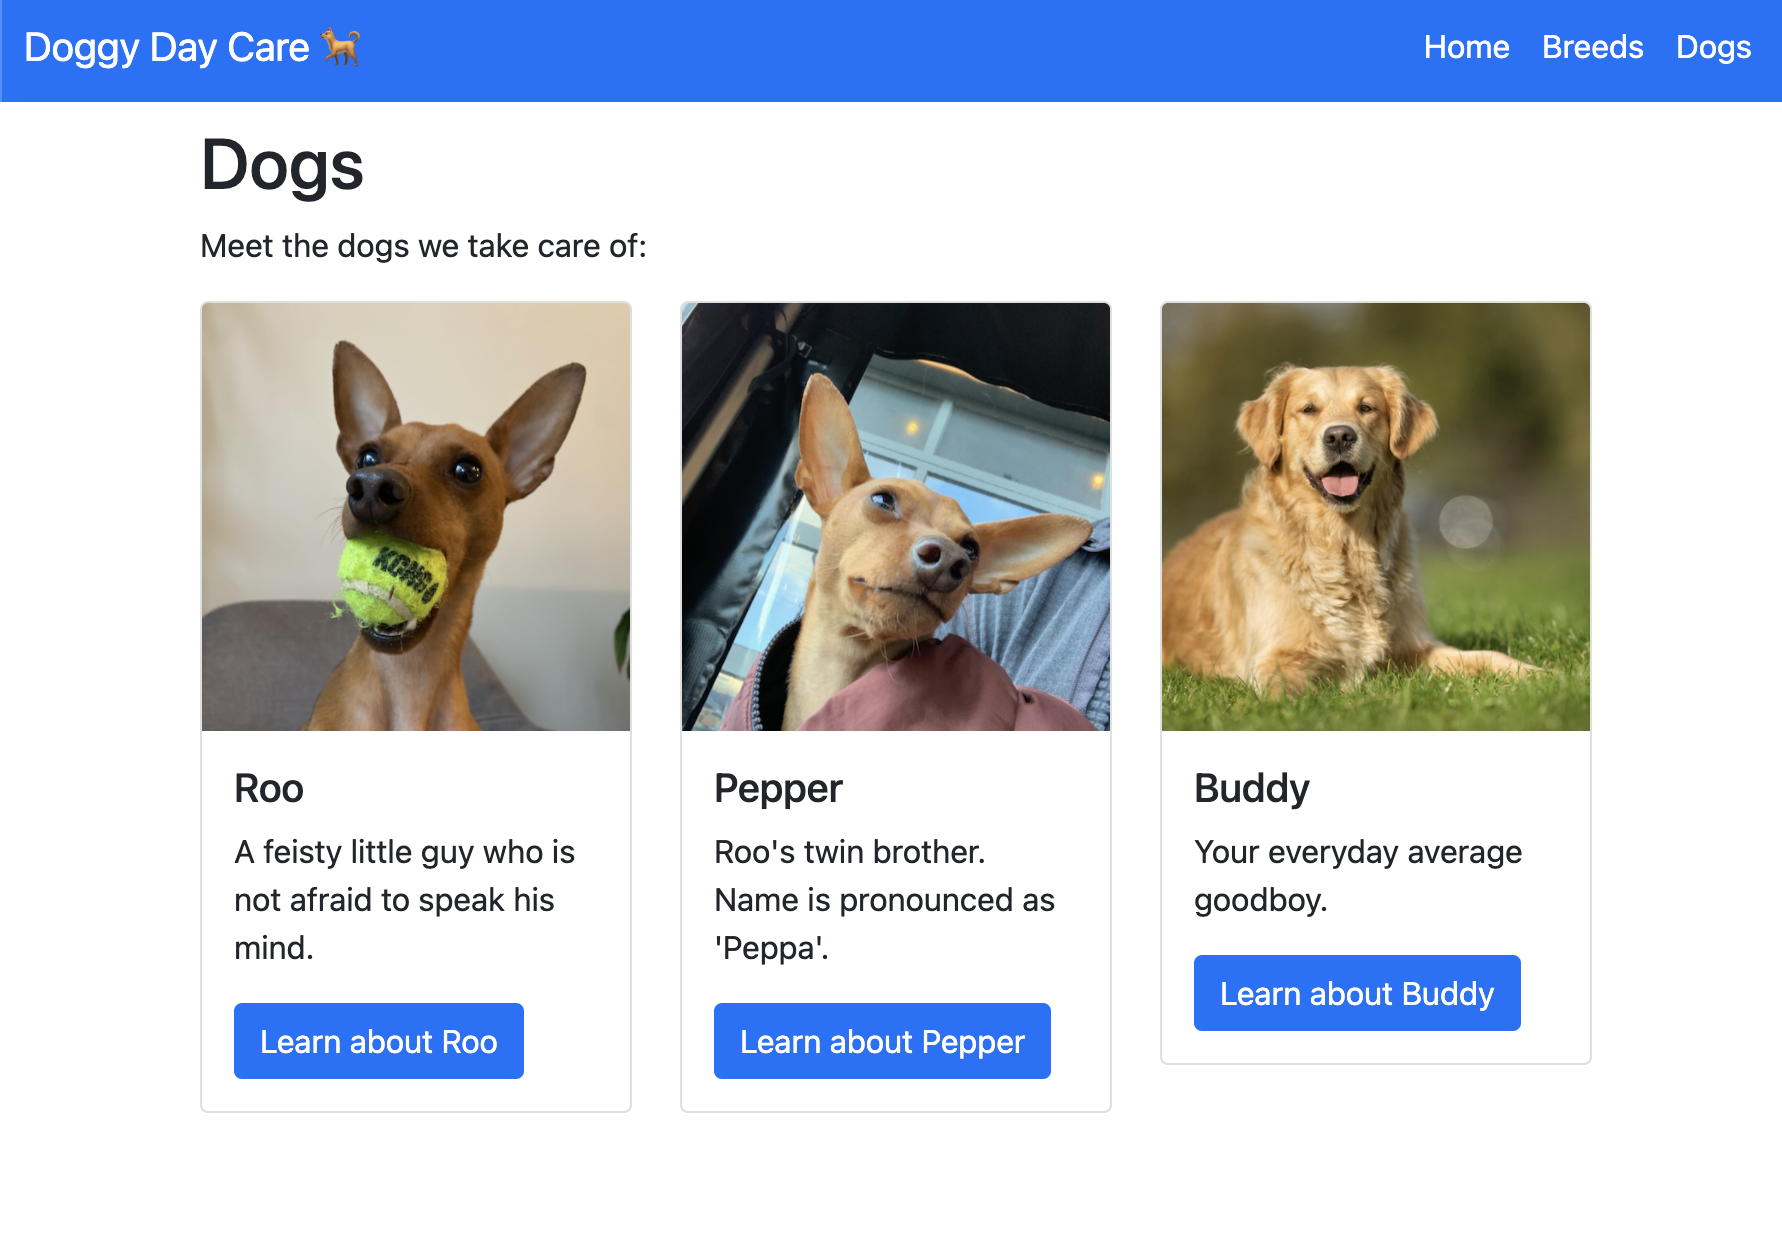
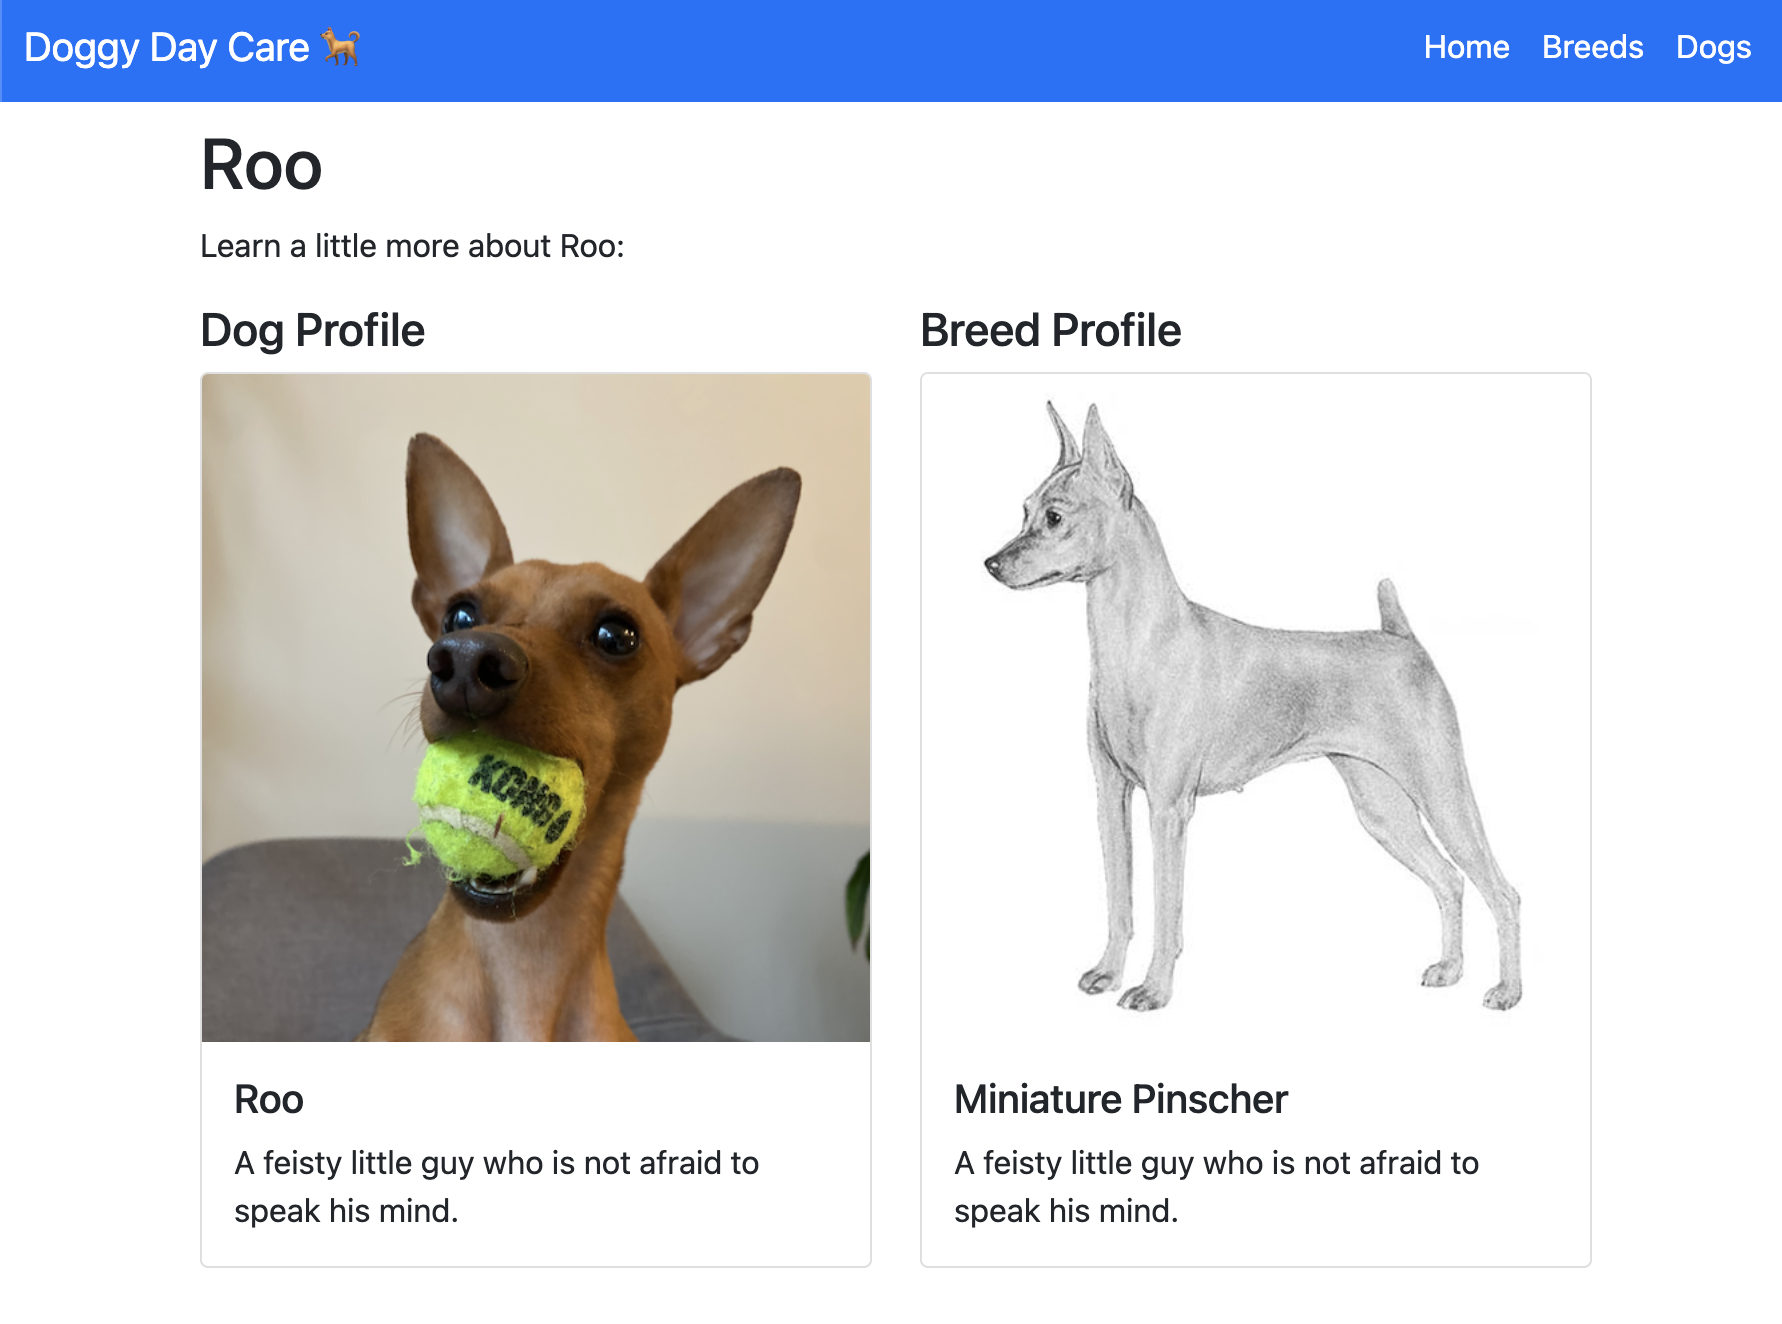
In my example we will build a simple web app for Doggy Day Care. Here is a preview of the finished product:
Home page
Breeds page
Dogs page
Dog profile
Project setup
Structure
To start lets create a brand new directory to set up our project in. Then we will create all of the files we need:
mkdir fastapi-beaniecd fastapi-beanietouch requirements.txt main.py# Set up the template filesmkdir templatestouch templates templates/_layout.html templates/index.html templates/breeds.html templates/dog_profile.html# Set up the static directorymkdir staticmkdir static/imgsmkdir static/imgs/breedsmkdir static/imgs/dogs# Download imagescurl --create-dirs -O --output-dir static/imgs https://github.com/SamEdwardes/personal-blog/raw/main/blog/2022-03-18-fastapi-beanie-one-page/_example-project/static/imgs/placeholder_square.jpegcurl --create-dirs -O --output-dir static/imgs/breeds https://github.com/SamEdwardes/personal-blog/raw/main/blog/2022-03-18-fastapi-beanie-one-page/_example-project/static/imgs/breeds/golden.pngcurl --create-dirs -O --output-dir static/imgs/breeds https://github.com/SamEdwardes/personal-blog/raw/main/blog/2022-03-18-fastapi-beanie-one-page/_example-project/static/imgs/breeds/min-pin.pngcurl --create-dirs -O --output-dir static/imgs/dogs https://github.com/SamEdwardes/personal-blog/raw/main/blog/2022-03-18-fastapi-beanie-one-page/_example-project/static/imgs/dogs/buddy.pngcurl --create-dirs -O --output-dir static/imgs/dogs https://github.com/SamEdwardes/personal-blog/raw/main/blog/2022-03-18-fastapi-beanie-one-page/_example-project/static/imgs/dogs/pepper.pngcurl --create-dirs -O --output-dir static/imgs/dogs https://github.com/SamEdwardes/personal-blog/raw/main/blog/2022-03-18-fastapi-beanie-one-page/_example-project/static/imgs/dogs/roo.pngAfter running the commands above your project should look like this:
.├── main.py # This is where your python code will go├── requirements.txt # This is where your dependencies are documented├── static # A directory that stores images that will be served.│ └── imgs│ ├── breeds│ │ ├── golden.png│ │ └── min-pin.png│ ├── dogs│ │ ├── buddy.png│ │ ├── pepper.png│ │ └── roo.png│ └── placeholder_square.jpeg└── templates # Your html files will live in here ├── dog_profile.html ├── breeds.html ├── index.html └── _layout.htmlPython dependencies
Then lets add our required dependencies to the requirements file:
echo fastapi > requirements.txtecho "uvicorn[standard]" >> requirements.txtecho beanie >> requirements.txtecho jinja2 >> requirements.txtLastly, lets create a virtual environment to isolate all of our python dependencies:
python -m venv .venvsource .venv/bin/activatepython -m pip install --upgrade pip wheelpip install -r requirements.txtAfter activating your virtual environment you should have your project all set up and ready to go 🎉
Installing MongoDB
Below are the instructions on how to install MongoDB for each operating system. You probably want to install the Community Edition.
Run the following commands to install MongoDB:
# Install the Xcode command-line tools by running the following command in your macOS Terminalxcode-select --install
# Install MongoDBbrew tap mongodb/brewbrew install mongodb-community@5.0
# Start MongoDBbrew services start mongodb-community@5.0
# Stop MongoDBbrew services stop mongodb-community@5.0Check out the official MongoDB docs here: https://docs.mongodb.com/manual/tutorial/install-mongodb-on-os-x/
Check out the official MongoDB docs: https://docs.mongodb.com/manual/administration/install-on-linux/
Check out the official MongoDB docs: https://docs.mongodb.com/manual/tutorial/install-mongodb-on-windows/
Full code overview
Now that you have all of the dependencies installed you are ready to start coding! Below is the complete code. Take a moment to review the code and see if you can tell what is going on. Then will we will walk through each part in detail and explain what is happening.
main.py: This is where all of our python code lives.
from typing import Optional
import motorfrom beanie import Document, Link, init_beaniefrom fastapi import FastAPI, Requestfrom fastapi.responses import HTMLResponsefrom fastapi.staticfiles import StaticFilesfrom fastapi.templating import Jinja2Templates

# --------------------------------------------------------------------------# Step 1: Define your models with Beanie# --------------------------------------------------------------------------class Breed(Document):    name: str    description: Optional[str]    country_of_origin: str    average_weight: Optional[int]    image_url: str = "imgs/placeholder_square.jpeg"

class Dog(Document):    name: str    description: Optional[str]    breed: Link[Breed]    owner: str    image_url: str = "imgs/placeholder_square.jpeg"

# --------------------------------------------------------------------------# Step 2: Create demo data# --------------------------------------------------------------------------async def create_data():    """A helper function to insert demo/starter data into your database."""    # Create some breeds    min_pin = Breed(        name="Miniature Pinscher",        description="A wee bit crazy 🤪",        country_of_origin="Germany",        average_weight=10,        image_url="imgs/breeds/min-pin.png"    )
    golden = Breed(        name="Golden Retriever",        description="Your everyday average good boy 😇",        country_of_origin="United States",        average_weight=50,        image_url="imgs/breeds/golden.png"    )
    # Create some dogs    roo = Dog(        name="Roo",        breed=min_pin,        owner="Sam",        image_url="imgs/dogs/roo.png",        description="A feisty little guy who is not afraid to speak his mind."    )
    pepper = Dog(        name="Pepper",        breed=min_pin,        owner="Allie",        image_url="imgs/dogs/pepper.png",        description="Roo's twin brother. Name is pronounced as 'Peppa'."    )
    buddy = Dog(        name="Buddy",        breed=golden,        owner="Olivia",        image_url="imgs/dogs/buddy.png",        description="Your everyday average good boy."    )
    # Insert data into the database.    for document in [min_pin, golden, roo, pepper, buddy]:        await document.insert()

# --------------------------------------------------------------------------# Step 3: Setup FastAPI and MongoDB database# --------------------------------------------------------------------------app = FastAPI()app.mount("/static", StaticFiles(directory="static"), name="static")templates = Jinja2Templates(directory="templates")
@app.on_event("startup")async def app_init():    client = motor.motor_asyncio.AsyncIOMotorClient("mongodb://localhost:27017")    database_names = await client.list_database_names()
    if "dogs" not in database_names:        create_demo_data = True    else:        create_demo_data = False
    app.db = client.dogs    await init_beanie(database=app.db, document_models=[Breed, Dog])
    if create_demo_data:        print("Creating demo data...")        await create_data()

# --------------------------------------------------------------------------# Step 4: Home page# --------------------------------------------------------------------------@app.get("/", response_class=HTMLResponse)async def index(request: Request):    context = {        "request": request,    }    return templates.TemplateResponse("index.html", context)

# --------------------------------------------------------------------------# Step 5: Breeds page# --------------------------------------------------------------------------@app.get("/breeds", response_class=HTMLResponse)async def read_item(request: Request):    breeds = await Breed.find_all().to_list()    context = {        "request": request,        "breeds": breeds    }    return templates.TemplateResponse("breeds.html", context)

# --------------------------------------------------------------------------# Step 6: Dogs page# --------------------------------------------------------------------------@app.get("/dogs", response_class=HTMLResponse)async def read_item(request: Request, breed_id: Optional[str] = None):    if breed_id:        breed = await Breed.get(breed_id)        dogs = await Dog.find( Dog.breed._id == breed.id, fetch_links=True).to_list()    else:        breed = None        dogs = await Dog.find_all().to_list()    context = {        "request": request,        "dogs": dogs,        "breed": breed    }    return templates.TemplateResponse("dogs.html", context)

# --------------------------------------------------------------------------# Step 7: Dog page# --------------------------------------------------------------------------@app.get("/dogs/{dog_id}", response_class=HTMLResponse)async def read_item(dog_id: str, request: Request):    dog = await Dog.get(dog_id, fetch_links=True)    context = {        "request": request,        "dog": dog    }    return templates.TemplateResponse("dog_profile.html", context)
templates/_layout.html: This template is the base template which all others will inherit from. It contains common elements such as the navigation bar and footer. This tutorial will not dive deep into Jinja2 templates, so just take a quick look at this code and then copy it into your project.
<!DOCTYPE html><html lang="en" class="h-100"> <head> <meta charset="UTF-8"> <meta name="description" content="Doggy day care web app"> <meta name="theme-color" content="#FFFFFF"/> <title>{% block title %}Doggy Day Care{% endblock %}</title> <link rel="stylesheet" href="https://cdn.jsdelivr.net/npm/bootstrap@5.1.3/dist/css/bootstrap.min.css" integrity="sha384-1BmE4kWBq78iYhFldvKuhfTAU6auU8tT94WrHftjDbrCEXSU1oBoqyl2QvZ6jIW3" crossorigin="anonymous"> {% block additional_css %} {% endblock %} </head> <body class="d-flex flex-column h-100" style="padding-top: 65px;"> <header> <nav class="navbar navbar-expand-md navbar-dark bg-primary fixed-top"> <div class="container-fluid"> <a class="navbar-brand text-white" href="/"> Doggy Day Care 🐕 </a> <button class="navbar-toggler" type="button" data-bs-toggle="collapse" data-bs-target="#navbarNavAltMarkup" aria-controls="navbarNavAltMarkup" aria-expanded="false" aria-label="Toggle navigation"> <span class="navbar-toggler-icon"></span> </button> <div class="collapse navbar-collapse flex-grow-1 text-right" id="navbarNavAltMarkup"> <ul class="navbar-nav ms-auto flex-nowrap"> <li class="nav-item"><a class="nav-link active" href="/">Home</a></li> <li class="nav-item"><a class="nav-link active" href="/breeds">Breeds</a></li> <li class="nav-item"><a class="nav-link active" href="/dogs">Dogs</a></li> </ul> </div> </div> </nav> </header> <main class="flex-shrink-0"> <div class="container"> <!-- The main content of the app. --> {% block main_content %} {% endblock %} </div> </main> <br> <footer class="footer mt-auto py-3 bg-light"> <div class="container"> <span class="text-muted">© Sam Edwardes</span> </div> </footer> <!-- Scripts --> <script src="https://cdn.jsdelivr.net/npm/bootstrap@5.1.3/dist/js/bootstrap.bundle.min.js" integrity="sha384-ka7Sk0Gln4gmtz2MlQnikT1wXgYsOg+OMhuP+IlRH9sENBO0LRn5q+8nbTov4+1p" crossorigin="anonymous"></script> {% block additional_js %} {% endblock %} </body></html>templates/index.html: The template for the home page.
{% extends "_layout.html" %}{% block main_content %}
<h1>Home</h1>
<p>Welcome to <b>Doggy Day Care</b>, the worlds best doggy day care 🎉</p><p>See the different breeds of dogs we accept here: <a href="/breeds"><b>breeds</b></a></p><p>Meet the current groups of attending dogs: <a href="/dogs"><b>our dogs</b></a></p>
{% endblock %}
templates/breeds.html: The templates for the breeds page.
{% extends "_layout.html" %}{% block main_content %}
<h1>Breeds</h1><p>Meet all of the different breeds we take care of:</p><div class="row">    {% for breed in breeds %}    <div class="col-6 mb-4">        <div class="card">            <img src="{{ url_for('static', path=breed.image_url) }}" class="card-img-top" alt="breed-pic">            <div class="card-body">            <h5 class="card-title">{{ breed.name }}</h5>            <p class="card-text">{{ breed.description }}</p>            <a href="/dogs?breed_id={{ breed.id }}" class="btn btn-primary">Meet the dogs</a>            </div>        </div>    </div>    {% endfor %}</div>
{% endblock %}
templates/dogs.html: The templates for the dogs page.
{% extends "_layout.html" %}{% block main_content %}
<h1>Dogs</h1>
<p>    Meet the    {% if breed %}    <b>{{ breed.name }}(s)</b>    {% else %}    dogs    {% endif %}     we take care of:</p>
<div class="row">    {% for dog in dogs %}    <div class="col-4">        <div class="card mb-4">            <img src="{{ url_for('static', path=dog.image_url) }}" class="card-img-top" alt="dog-pic">            <div class="card-body">            <h5 class="card-title">{{ dog.name }}</h5>            <p class="card-text">{{ dog.description }}</p>            <a href="/dogs/{{ dog.id }}" class="btn btn-primary">Learn about {{ dog.name }}</a>            </div>        </div>    </div>    {% endfor %}</div>
{% endblock %}
templates/dog_profile.html: The templates for the dog profile page.
{% extends "_layout.html" %}{% block main_content %}
<h1>{{ dog.name }}</h1>
<p>Learn a little more about {{ dog.name }}:</p>
<div class="row">    <div class="col">        <h4>Dog Profile</h4>        <div class="card">            <img src="{{ url_for('static', path=dog.image_url) }}" class="card-img-top" alt="dog-pic">            <div class="card-body">            <h5 class="card-title">{{ dog.name }}</h5>            <p class="card-text">{{ dog.description }}</p>            </div>        </div>    </div>    <div class="col">        <h4>Breed Profile</h4>        <div class="card">            <img src="{{ url_for('static', path=dog.breed.image_url) }}" class="card-img-top" alt="dog-pic">            <div class="card-body">            <h5 class="card-title">{{ dog.breed.name }}</h5>            <p class="card-text">{{ dog.description }}</p>            </div>        </div>    </div></div>
{% endblock %}
Step 1: Define your models with Beanie
One of the cool parts about using Beanie is that you can define your models using Pydantic. In our example app there will be two two classes: Breed and Dog. In terms of MongoDB each one of these python classes is a collection. Each instance of a class is a document.
from typing import Optionalfrom beanie import Document, Link
# --------------------------------------------------------------------------# Step 1: Define your models with Beanie# --------------------------------------------------------------------------class Breed(Document):    name: str    description: Optional[str]    country_of_origin: str    average_weight: Optional[int]    image_url: str = "imgs/placeholder_square.jpeg"

class Dog(Document):    name: str    description: Optional[str]    breed: Link[Breed]    owner: str    image_url: str = "imgs/placeholder_square.jpeg"
Note that there are a few differences between the Beanie models defined above, and a “normal” Pydantic model:
- Each class inherits from
beanie.Documentas opposed topydantic.BaseModel. By inheriting frombeanie.Documentthe model will know how to interact with MongoDB. - The attribute
Dog.breedis a special kind of attribute in Beanie. TheLinktype tells Beanie to create a relationship betweenDogandBreed. TheDog.breedattribute will contain a reference to aBreeddocument.
Step 2: Create demo data
In order for our app to be interesting we need to fill the MongoDB database with some demo data. The code below creates five documents: two dog breeds, and three dogs. To define a new document you create a new instance of a Document class. Then each document is inserted into the database.
# --------------------------------------------------------------------------# Step 2: Create demo data# --------------------------------------------------------------------------async def create_data():    """A helper function to insert demo/starter data into your database."""    # Create some breeds    min_pin = Breed(        name="Miniature Pinscher",        description="A wee bit crazy 🤪",        country_of_origin="Germany",        average_weight=10,        image_url="imgs/breeds/min-pin.png"    )
    golden = Breed(        name="Golden Retriever",        description="Your everyday average good boy 😇",        country_of_origin="United States",        average_weight=50,        image_url="imgs/breeds/golden.png"    )
    # Create some dogs    roo = Dog(        name="Roo",        breed=min_pin,        owner="Sam",        image_url="imgs/dogs/roo.png",        description="A feisty little guy who is not afraid to speak his mind."    )
    pepper = Dog(        name="Pepper",        breed=min_pin,        owner="Allie",        image_url="imgs/dogs/pepper.png",        description="Roo's twin brother. Name is pronounced as 'Peppa'."    )
    buddy = Dog(        name="Buddy",        breed=golden,        owner="Olivia",        image_url="imgs/dogs/buddy.png",        description="Your everyday average good boy."    )
# Insert data into the database. for document in [min_pin, golden, roo, pepper, buddy]: await document.insert()The function is async. This is because beanie only supports async interactions with MongoDB. Therefore, whenever we are interacting with the database it must be async. This could change in the future, but as of March 2022 beanie is ONLY async.
Step 3: Setup FastAPI and MongoDB database
The next task is to set up our FastAPI app, and initialize our MongoDB database.
from fastapi import FastAPIfrom fastapi.staticfiles import StaticFilesfrom fastapi.templating import Jinja2Templatesimport motor
# --------------------------------------------------------------------------# Step 3: Setup FastAPI and MongoDB database# --------------------------------------------------------------------------app = FastAPI()app.mount("/static", StaticFiles(directory="static"), name="static")templates = Jinja2Templates(directory="templates")
@app.on_event("startup")async def app_init():    client = motor.motor_asyncio.AsyncIOMotorClient("mongodb://localhost:27017")    database_names = await client.list_database_names()
    if "dogs" not in database_names:        create_demo_data = True    else:        create_demo_data = False
    app.db = client.dogs    await init_beanie(database=app.db, document_models=[Breed, Dog])
    if create_demo_data:        print("Creating demo data...")        await create_data()
Lets dive into the key parts:
from fastapi import FastAPIfrom fastapi.staticfiles import StaticFilesfrom fastapi.templating import Jinja2Templatesimport motor
# --------------------------------------------------------------------------# Step 3: Setup FastAPI and MongoDB database# --------------------------------------------------------------------------app = FastAPI()# highlight-startapp.mount("/static", StaticFiles(directory="static"), name="static")templates = Jinja2Templates(directory="templates")# highlight-end
@app.on_event("startup")async def app_init():    client = motor.motor_asyncio.AsyncIOMotorClient("mongodb://localhost:27017")    database_names = await client.list_database_names()
    if "dogs" not in database_names:        create_demo_data = True    else:        create_demo_data = False
    app.db = client.dogs    await init_beanie(database=app.db, document_models=[Breed, Dog])
    if create_demo_data:        print("Creating demo data...")        await create_data()
Create a FastAPI app as your normally would. What may look a little bit less familiar are the highlighted lines above.
- First we mount the directory we created named
staticto our app. This will allow FastAPI to access the files in this directory from the app. - Second we tell FastAPI where to find our template files. This template files define the UI of our website using the templating language Jinja2.
Next, we define a function that tells that app what do do on start up. This function will be called every time the app starts up (or restarts).
from fastapi import FastAPIfrom fastapi.staticfiles import StaticFilesfrom fastapi.templating import Jinja2Templatesimport motor
# --------------------------------------------------------------------------# Step 3: Setup FastAPI and MongoDB database# --------------------------------------------------------------------------app = FastAPI()app.mount("/static", StaticFiles(directory="static"), name="static")templates = Jinja2Templates(directory="templates")
# highlight-start@app.on_event("startup")async def app_init():    client = motor.motor_asyncio.AsyncIOMotorClient("mongodb://localhost:27017")    database_names = await client.list_database_names()# highlight-end
    if "dogs" not in database_names:        create_demo_data = True    else:        create_demo_data = False
    # highlight-start    app.db = client.dogs    await init_beanie(database=app.db, document_models=[Breed, Dog])    # highlight-end
if create_demo_data: print("Creating demo data...") await create_data()- Note the function is async. This is because we will be interacting with the MongoDB database.
- First we use
motorto connect to the MongoDB database. In this case, we are running MongoDB on our local computer. If you were connecting to a cloud instance of MongoDB you would need to change the connection string. - Next we get a list of all the database names in MongoDB. We do this to check if the “dogs” database has been created yet. If it has not been created, we will insert our demo data. If it has already been created, we will not insert any demo data.
In a “real” production app you would probably not have any logic here to check if the database has been created already. We put the logic in this app simply because it is a demo app.
- Lastly we call the
init_beaniefunction. The key bit here is that we pass a list ofDocumentobjects. This tells Beanie how to interact with MongoDB database.
Step 4: Home page
With all our set up complete, now things can start to get fun! All that is left to do is define the routes in our app. Each webpage in our app needs a corresponding function that tells the app what content to send to the web browser. Lets take a look at our homepage function:
from fastapi.responses import HTMLResponse
# --------------------------------------------------------------------------# Step 4: Home page# --------------------------------------------------------------------------@app.get("/", response_class=HTMLResponse)async def index(request: Request):    context = {        "request": request,    }    return templates.TemplateResponse("index.html", context)
Lets break down the key parts:
from fastapi.responses import HTMLResponse
# --------------------------------------------------------------------------# Step 4: Home page# --------------------------------------------------------------------------# highlight-start@app.get("/", response_class=HTMLResponse)# highlight-endasync def index(request: Request): context = { "request": request, } return templates.TemplateResponse("index.html", context)- The first argument in
@app.getis the URL path. Every time a web browser visits the homepage (http://127.0.0.1:8000/) this function will be called. - Notice that we have defined a
response_class. By declaringresponse_class=HTMLResponsethe docs UI will be able to know that the response will be HTML.
from fastapi.responses import HTMLResponse
# --------------------------------------------------------------------------# Step 4: Home page# --------------------------------------------------------------------------@app.get("/", response_class=HTMLResponse)# highlight-startasync def index(request: Request):# highlight-end context = { "request": request, } return templates.TemplateResponse("index.html", context)- Our homepage is pretty simple and does not have any query parameters or user input. If you are used to using FastAPI for APIs or using flask you are probably surprised to see
request: Request. When rendering a template in FastAPI you must send the request object (https://fastapi.tiangolo.com/advanced/templates/?h=template#using-jinja2templates).
from fastapi.responses import HTMLResponse
# --------------------------------------------------------------------------# Step 4: Home page# --------------------------------------------------------------------------@app.get("/", response_class=HTMLResponse)async def index(request: Request): # highlight-start context = { "request": request, } return templates.TemplateResponse("index.html", context) # highlight-end- When you want to return an HTML page, you must return
templates.TemplateResponse. Remember we definedtemplatesfurther app inmain.pyand told FastAPI where the templates are saved. templates.TemplateResponsewill always take two arguments:- The location of the template, relative to the path that you defined above (e.g.
templates = Jinja2Templates(directory="templates")). - The
contextwhich is a dictionary. It must always contain"request": request. For our homepage, there is no other data to pass along, but as you will see in the next pages additional information will be passed to the context. Basically the context must contain any data that your template expects to receive.
- The location of the template, relative to the path that you defined above (e.g.
Step 5: Breeds page
Our next view will be a little bit more interesting, here we will pass some additional data into our template to dynamically render HTML for each breed.
# --------------------------------------------------------------------------# Step 5: Breeds page# --------------------------------------------------------------------------@app.get("/breeds", response_class=HTMLResponse)async def read_item(request: Request): breeds = await Breed.find_all().to_list() context = { "request": request, "breeds": breeds } return templates.TemplateResponse("breeds.html", context)The first few lines look pretty similar to the homepage. Again we must define response_class=HTMLResponse and request: Request. What is new this time is the additional key value pair that we have passed into the context.
Lets take a closer look at the template to see what is going on:
I won’t dive into the Jinja2 syntax in this blog post, but hopefully it is easy enough to see what is happening. The template is expecting a variable named breeds. It then loops over that variable and for each breed creates a Bootstrap Card component.
Because the template is expecting a variable named breeds, we must pass it into the context.
# --------------------------------------------------------------------------# Step 5: Breeds page# --------------------------------------------------------------------------@app.get("/breeds", response_class=HTMLResponse)async def read_item(request: Request): breeds = await Breed.find_all().to_list() # highlight-start context = { "request": request, "breeds": breeds } return templates.TemplateResponse("breeds.html", context) # highlight-endStep 6: Dogs page
In our next view we add an additional layer of complexity. The /dogs view includes an optional query parameter breed_id. If a breed_id is provided the page will only render all the dogs of that specific breed:
http://127.0.0.1:8000/dogs?breed_id=62408cc988015b2618098bbfOtherwise, it will render all of the dogs.
http://127.0.0.1:8000/dogsLets take a closer look at the function:
# --------------------------------------------------------------------------# Step 6: Dogs page# --------------------------------------------------------------------------@app.get("/dogs", response_class=HTMLResponse)async def read_item(request: Request, breed_id: Optional[str] = None): if breed_id: breed = await Breed.get(breed_id) dogs = await Dog.find( Dog.breed._id == breed.id, fetch_links=True).to_list() else: breed = None dogs = await Dog.find_all().to_list() context = { "request": request, "dogs": dogs, "breed": breed } return templates.TemplateResponse("dogs.html", context)In the function definition we have provided an argument named breed_id.
# --------------------------------------------------------------------------# Step 6: Dogs page# --------------------------------------------------------------------------@app.get("/dogs", response_class=HTMLResponse)# highlight-startasync def read_item(request: Request, breed_id: Optional[str] = None):# highlight-end if breed_id: breed = await Breed.get(breed_id) dogs = await Dog.find( Dog.breed._id == breed.id, fetch_links=True).to_list() else: breed = None dogs = await Dog.find_all().to_list() context = { "request": request, "dogs": dogs, "breed": breed } return templates.TemplateResponse("dogs.html", context)FastAPI is really good at figuring out what each argument means. In this case, it automatically determines that the breed_id is a query parameter. It also knows that it is optional because we have used the Optional type. See https://fastapi.tiangolo.com/tutorial/query-params/#query-parameters for an explanation on how FastAPI decides if an argument is a query parameter or path parameter:
When you declare other function parameters that are not part of the path parameters, they are automatically interpreted as “query” parameters.
# --------------------------------------------------------------------------# Step 6: Dogs page# --------------------------------------------------------------------------@app.get("/dogs", response_class=HTMLResponse)async def read_item(request: Request, breed_id: Optional[str] = None): # highlight-start if breed_id: breed = await Breed.get(breed_id) dogs = await Dog.find( Dog.breed._id == breed.id, fetch_links=True).to_list() else: breed = None dogs = await Dog.find_all().to_list() # highlight-end context = { "request": request, "dogs": dogs, "breed": breed } return templates.TemplateResponse("dogs.html", context)In this code snippet we apply the logic to determine which dogs to get from the database. If no breed_id is specified we get all of the dogs.
# --------------------------------------------------------------------------# Step 6: Dogs page# --------------------------------------------------------------------------@app.get("/dogs", response_class=HTMLResponse)async def read_item(request: Request, breed_id: Optional[str] = None): if breed_id: breed = await Breed.get(breed_id) dogs = await Dog.find( Dog.breed._id == breed.id, fetch_links=True).to_list() else: breed = None dogs = await Dog.find_all().to_list() # highlight-start context = { "request": request, "dogs": dogs, "breed": breed } return templates.TemplateResponse("dogs.html", context) # highlight-endLastly, as with the above views we create our context dictionary. This context has three key value pairs:
- The required request object that must always be returned.
- A list of dog objects.
- An optional breed object.
Note that the template applies conditional logic to only render the breeds name if the breed is not None.
{% extends "_layout.html" %}{% block main_content %}
<h1>Dogs</h1>
<p>    Meet the    {% if breed %}    <b>{{ breed.name }}(s)</b>    {% else %}    dogs    {% endif %}     we take care of:</p>
<div class="row">    {% for dog in dogs %}    <div class="col-4">        <div class="card mb-4">            <img src="{{ url_for('static', path=dog.image_url) }}" class="card-img-top" alt="dog-pic">            <div class="card-body">            <h5 class="card-title">{{ dog.name }}</h5>            <p class="card-text">{{ dog.description }}</p>            <a href="/dogs/{{ dog.id }}" class="btn btn-primary">Learn about {{ dog.name }}</a>            </div>        </div>    </div>    {% endfor %}</div>
{% endblock %}
Step 7: Dog page
In our web app each dog has it’s very own profile page. Here we take a new approach and use a path parameter:
# --------------------------------------------------------------------------# Step 7: Dog page# --------------------------------------------------------------------------@app.get("/dogs/{dog_id}", response_class=HTMLResponse)async def read_item(dog_id: str, request: Request): dog = await Dog.get(dog_id, fetch_links=True) context = { "request": request, "dog": dog } return templates.TemplateResponse("dog_profile.html", context)Like we said above, FastAPI is really smart at determining if an argument is a path parameter or a query parameter.
# --------------------------------------------------------------------------# Step 7: Dog page# --------------------------------------------------------------------------# highlight-start@app.get("/dogs/{dog_id}", response_class=HTMLResponse)async def read_item(dog_id: str, request: Request):# highlight-end dog = await Dog.get(dog_id, fetch_links=True) context = { "request": request, "dog": dog } return templates.TemplateResponse("dog_profile.html", context)In this case, FastAPI knows that it is a path parameter because we have defined {dog_id} in our views url path, and we have used the same string dog_id in our function definition. Because the two values are the same, FastAPI knows they related to one another.
The order does not matter. FastAPI knows that dog_id is a path parameter
because we also have a {dog_id} in our URL path. See
https://fastapi.tiangolo.com/tutorial/path-params/ for more info.
# --------------------------------------------------------------------------# Step 7: Dog page# --------------------------------------------------------------------------@app.get("/dogs/{dog_id}", response_class=HTMLResponse)async def read_item(dog_id: str, request: Request):# highlight-start dog = await Dog.get(dog_id, fetch_links=True) context = { "request": request, "dog": dog } return templates.TemplateResponse("dog_profile.html", context)# highlight-endJust like before, we query the database, and then return our context dictionary. This time the context only includes the required request object and a single dog object. The template will render a nice profile page for each dog.
{% extends "_layout.html" %}{% block main_content %}
<h1>{{ dog.name }}</h1>
<p>Learn a little more about {{ dog.name }}:</p>
<div class="row">    <div class="col">        <h4>Dog Profile</h4>        <div class="card">            <img src="{{ url_for('static', path=dog.image_url) }}" class="card-img-top" alt="dog-pic">            <div class="card-body">            <h5 class="card-title">{{ dog.name }}</h5>            <p class="card-text">{{ dog.description }}</p>            </div>        </div>    </div>    <div class="col">        <h4>Breed Profile</h4>        <div class="card">            <img src="{{ url_for('static', path=dog.breed.image_url) }}" class="card-img-top" alt="dog-pic">            <div class="card-body">            <h5 class="card-title">{{ dog.breed.name }}</h5>            <p class="card-text">{{ dog.description }}</p>            </div>        </div>    </div></div>
{% endblock %}
Wrap up
Congratulations! You just built a fully functional and asynchronous web app using FastAPI, Beanie, and MongoDB 🎉. This app was pretty basic, but is a good starting point for developing something more complex and interesting. Here are a few ideas on how you could extend the app:
- Refactor the code into more than one file (e.g. not all the code needs to live in
main.py). - Add a forms so that the users can add new breeds and new dogs.
Further learning
Check out these useful resources for learning more about MongoDB, FastAPI, and Beanie.