I have recently been exploring how to use FastAPI to build web apps. Check out this recent blog post How to create a FastAPI Web App with MongoDB and Beanie. One area I have found difficult is configuring authentication for web apps in FastAPI. The FastAPI security docs are really good, however they focus only on securing API endpoints, and not how to implement security for a web app. This blog post will demonstrate how to stand up a fully functional FastAPI web app with authentication.
TL/DR
All of the code can be found on GitHub: https://github.com/SamEdwardes/personal-blog/tree/main/blog/2022-04-14-fastapi-webpage-with-auth. You can download the code as a zip file using think link from DownGit. If you you want to see the complete code jump right to the Full code overview section of this blog post.
Motivation
Setting up authentication is an important step in taking your app from a proof of concept to something you can actually deploy and use. In this blog post I want to implement authentication in a FastAPI app that works for web apps.
The site I will build is very simple, but hopefully it is complex enough to demonstrate how you could expand on these concepts and build out a full functional web app with authentication. There are two primary ways I want to use authentication:
- Define endpoints that are only accessible to users who have authenticated, and
- Have content in pages that will dynamically render only if a user is authenticated.
Expand this section to see a screenshot and brief description of each page.
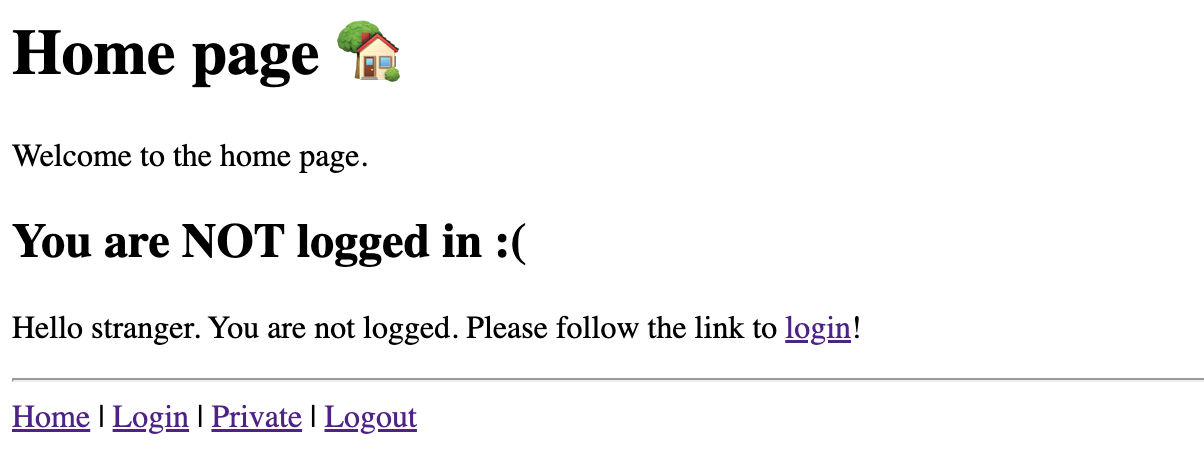
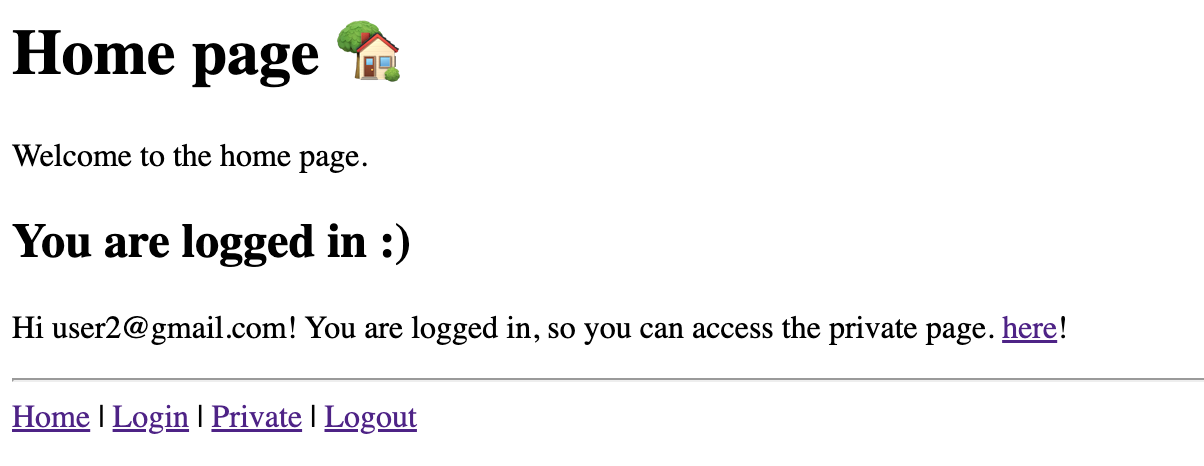
Home page
The home page has two different possible views. A view for users who are NOT logged in:
And a view for users who are logged in:
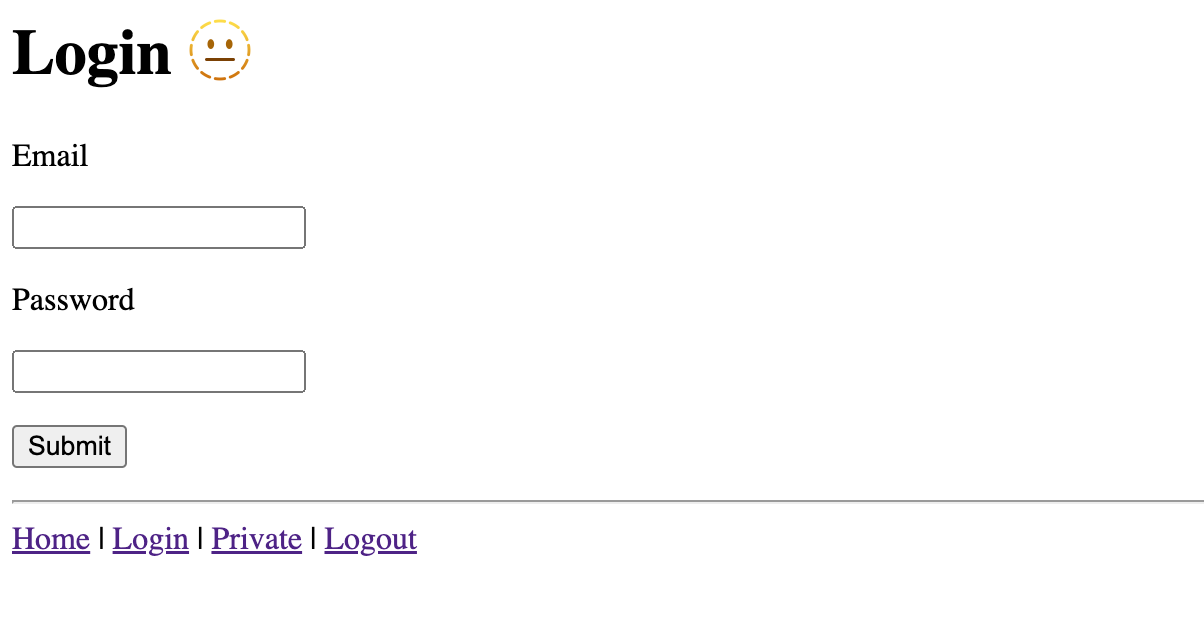
Login page
A simple login page:
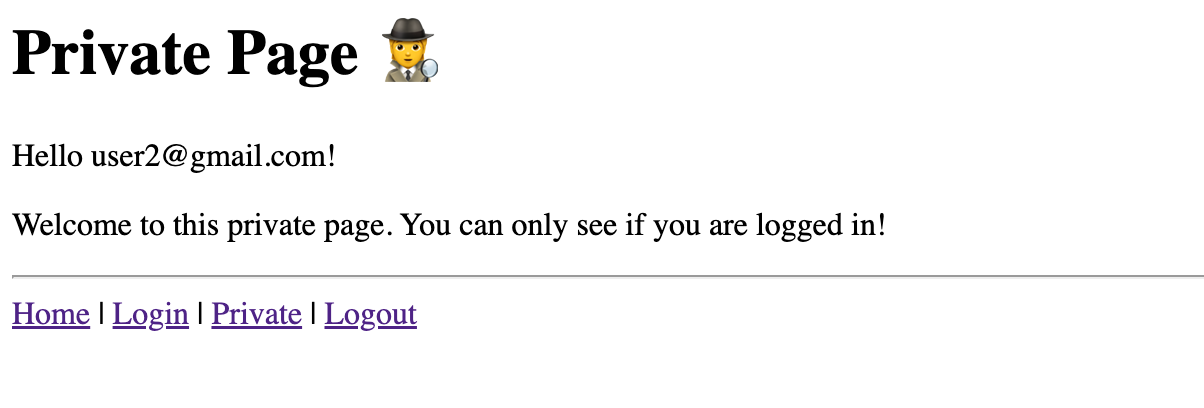
Private page
A “private” page that can only be viewed by users who are logged in:
If you try to view the page before logging in you will get this response:

Project setup
To get started first create a new directory for all of the project files and then create/activate a python virtual environment:
mkdir fastapi-webappcd fastapi-webapppython -m venv .venvsource .venv/bin/activatepython -m pip install --upgrade pip wheelNext, set up the file structure for the project:
touch main.py requirements.txtmkdir templatestouch templates/_site_map.html templates/index.html templates/login.html templates/private.htmlAfter running the commands your file structure should look like this:
.├── main.py├── requirements.txt└── templates ├── _site_map.html ├── index.html ├── login.html └── private.htmlNext, set up your requirements.txt file:
cat << EOF > requirements.txtfastapiuvicorn[standard]python-multipartfastapi-loginpasslib[bcrypt]python-josejinja2richEOFInstall all of the requirements, and you are ready to go!
pip install -r requirements.txtIf you want to see the app running in action copy and paste the code from the Full code overview section into the appropriate file. Then run the following to launch the app:
uvicorn main:app --reloadFull code overview
Your project structure will look like this:
.├── main.py├── requirements.txt└── templates ├── _site_map.html ├── index.html ├── login.html └── private.htmlBelow is the complete code for each file 🎉!
fastapiuvicorn[standard]python-multipartfastapi-loginpasslib[bcrypt]python-josejinja2richimport datetime as dtfrom typing import Dict, List, Optional
from fastapi import Depends, FastAPI, HTTPException, Request, Response, statusfrom fastapi.openapi.models import OAuthFlows as OAuthFlowsModelfrom fastapi.responses import HTMLResponse, RedirectResponsefrom fastapi.security import OAuth2, OAuth2PasswordRequestFormfrom fastapi.security.utils import get_authorization_scheme_paramfrom fastapi.templating import Jinja2Templatesfrom jose import JWTError, jwtfrom passlib.handlers.sha2_crypt import sha512_crypt as cryptofrom pydantic import BaseModelfrom rich import inspect, printfrom rich.console import Console
console = Console()
# --------------------------------------------------------------------------# Models and Data# --------------------------------------------------------------------------class User(BaseModel): username: str hashed_password: str
# Create a "database" to hold your data. This is just for example purposes. In# a real world scenario you would likely connect to a SQL or NoSQL database.class DataBase(BaseModel): user: List[User]
DB = DataBase( user=[ User(username="user1@gmail.com", hashed_password=crypto.hash("12345")), User(username="user2@gmail.com", hashed_password=crypto.hash("12345")), ])
def get_user(username: str) -> User: user = [user for user in DB.user if user.username == username] if user: return user[0] return None
# --------------------------------------------------------------------------# Setup FastAPI# --------------------------------------------------------------------------class Settings: SECRET_KEY: str = "secret-key" ALGORITHM = "HS256" ACCESS_TOKEN_EXPIRE_MINUTES = 30 # in mins COOKIE_NAME = "access_token"
app = FastAPI()templates = Jinja2Templates(directory="templates")settings = Settings()
# --------------------------------------------------------------------------# Authentication logic# --------------------------------------------------------------------------class OAuth2PasswordBearerWithCookie(OAuth2): """ This class is taken directly from FastAPI: https://github.com/tiangolo/fastapi/blob/26f725d259c5dbe3654f221e608b14412c6b40da/fastapi/security/oauth2.py#L140-L171
The only change made is that authentication is taken from a cookie instead of from the header! """ def __init__( self, tokenUrl: str, scheme_name: Optional[str] = None, scopes: Optional[Dict[str, str]] = None, description: Optional[str] = None, auto_error: bool = True, ): if not scopes: scopes = {} flows = OAuthFlowsModel(password={"tokenUrl": tokenUrl, "scopes": scopes}) super().__init__( flows=flows, scheme_name=scheme_name, description=description, auto_error=auto_error, )
async def __call__(self, request: Request) -> Optional[str]: # IMPORTANT: this is the line that differs from FastAPI. Here we use # `request.cookies.get(settings.COOKIE_NAME)` instead of # `request.headers.get("Authorization")` authorization: str = request.cookies.get(settings.COOKIE_NAME) scheme, param = get_authorization_scheme_param(authorization) if not authorization or scheme.lower() != "bearer": if self.auto_error: raise HTTPException( status_code=status.HTTP_401_UNAUTHORIZED, detail="Not authenticated", headers={"WWW-Authenticate": "Bearer"}, ) else: return None return param
oauth2_scheme = OAuth2PasswordBearerWithCookie(tokenUrl="token")
def create_access_token(data: Dict) -> str: to_encode = data.copy() expire = dt.datetime.utcnow() + dt.timedelta(minutes=settings.ACCESS_TOKEN_EXPIRE_MINUTES) to_encode.update({"exp": expire}) encoded_jwt = jwt.encode( to_encode, settings.SECRET_KEY, algorithm=settings.ALGORITHM ) return encoded_jwt
def authenticate_user(username: str, plain_password: str) -> User: user = get_user(username) if not user: return False if not crypto.verify(plain_password, user.hashed_password): return False return user
def decode_token(token: str) -> User: credentials_exception = HTTPException( status_code=status.HTTP_401_UNAUTHORIZED, detail="Could not validate credentials." ) token = token.removeprefix("Bearer").strip() try: payload = jwt.decode(token, settings.SECRET_KEY, algorithms=[settings.ALGORITHM]) username: str = payload.get("username") if username is None: raise credentials_exception except JWTError as e: print(e) raise credentials_exception
user = get_user(username) return user
def get_current_user_from_token(token: str = Depends(oauth2_scheme)) -> User: """ Get the current user from the cookies in a request.
Use this function when you want to lock down a route so that only authenticated users can see access the route. """ user = decode_token(token) return user
def get_current_user_from_cookie(request: Request) -> User: """ Get the current user from the cookies in a request.
Use this function from inside other routes to get the current user. Good for views that should work for both logged in, and not logged in users. """ token = request.cookies.get(settings.COOKIE_NAME) user = decode_token(token) return user
@app.post("token")def login_for_access_token( response: Response, form_data: OAuth2PasswordRequestForm = Depends()) -> Dict[str, str]: user = authenticate_user(form_data.username, form_data.password) if not user: raise HTTPException(status_code=status.HTTP_401_UNAUTHORIZED, detail="Incorrect username or password") access_token = create_access_token(data={"username": user.username})
# Set an HttpOnly cookie in the response. `httponly=True` prevents # JavaScript from reading the cookie. response.set_cookie( key=settings.COOKIE_NAME, value=f"Bearer {access_token}", httponly=True ) return {settings.COOKIE_NAME: access_token, "token_type": "bearer"}
# --------------------------------------------------------------------------# Home Page# --------------------------------------------------------------------------@app.get("/", response_class=HTMLResponse)def index(request: Request): try: user = get_current_user_from_cookie(request) except: user = None context = { "user": user, "request": request, } return templates.TemplateResponse("index.html", context)
# --------------------------------------------------------------------------# Private Page# --------------------------------------------------------------------------# A private page that only logged in users can access.@app.get("/private", response_class=HTMLResponse)def index(request: Request, user: User = Depends(get_current_user_from_token)): context = { "user": user, "request": request } return templates.TemplateResponse("private.html", context)
# --------------------------------------------------------------------------# Login - GET# --------------------------------------------------------------------------@app.get("/auth/login", response_class=HTMLResponse)def login_get(request: Request): context = { "request": request, } return templates.TemplateResponse("login.html", context)
# --------------------------------------------------------------------------# Login - POST# --------------------------------------------------------------------------class LoginForm: def __init__(self, request: Request): self.request: Request = request self.errors: List = [] self.username: Optional[str] = None self.password: Optional[str] = None
async def load_data(self): form = await self.request.form() self.username = form.get("username") self.password = form.get("password")
async def is_valid(self): if not self.username or not (self.username.__contains__("@")): self.errors.append("Email is required") if not self.password or not len(self.password) >= 4: self.errors.append("A valid password is required") if not self.errors: return True return False
@app.post("/auth/login", response_class=HTMLResponse)async def login_post(request: Request): form = LoginForm(request) await form.load_data() if await form.is_valid(): try: response = RedirectResponse("/", status.HTTP_302_FOUND) login_for_access_token(response=response, form_data=form) form.__dict__.update(msg="Login Successful!") console.log("[green]Login successful!!!!") return response except HTTPException: form.__dict__.update(msg="") form.__dict__.get("errors").append("Incorrect Email or Password") return templates.TemplateResponse("login.html", form.__dict__) return templates.TemplateResponse("login.html", form.__dict__)
# --------------------------------------------------------------------------# Logout# --------------------------------------------------------------------------@app.get("/auth/logout", response_class=HTMLResponse)def login_get(): response = RedirectResponse(url="/") response.delete_cookie(settings.COOKIE_NAME) return response<h1>Home page 🏡</h1>
<p>Welcome to the home page.</p>
{% if user %} <h2>You are logged in :)</h2> <p> Hi {{ user.username }}! You are logged in, so you can access the private page. <a href="/private">here</a>! </p>{% else %} <h2>You are NOT logged in :(</h2> <p> Hello stranger. You are not logged. Please follow the link to <a href="/auth/login" class="btn">login</a>! </p>{% endif %}
<hr>
{% include '_site_map.html' %}<h1>Login 🫥</h1>
{% for error in errors %} <p style="color: red">{{ error }}</p>{% endfor %}<form action="/auth/login" method="post"> <p> <p><label for="">Email</label></p> <input type="email" name="username" value="{{ username }}" required> </p> <p> <p><label for="">Password</label></p> <input type="password" name="password" value="{{ password }}" required> </p> <input type="submit" value="Submit"></form>
<hr>
{% include '_site_map.html' %}<h1>Private Page 🕵️</h1>
<p>Hello {{ user.username }}!</p>
<p>Welcome to this private page. You can only see if you are logged in!</p>
<hr>
{% include '_site_map.html' %}<!--This code snippet will appear in each file, so to avoid re-writing it we defineit only once here.-->
<a href="/">Home</a> |<a href="/auth/login">Login</a> |<a href="/private">Private</a> |<a href="/auth/logout">Logout</a>Code walk through
In the following section I will walk through the key parts of code and describe what they are doing.
Step 1: Models and data
In order to keep our example simple our app will not use an external database. Instead, we will just use pydantic models to define some dummy data.
One key item it point out is the use of passlib. When a we create our user we hash the password. Imagine that you were storing data about your users in a database. It is important to hash the password so that if data was ever exposed to the public the passwords would be hashed, and not readable to the public.
We have also created a function called get_user. This function will be used in many places throughout to access users from our “database”.
from typing import Listfrom pydantic import BaseModelfrom passlib.handlers.sha2_crypt import sha512_crypt as crypto
# --------------------------------------------------------------------------# Models and Data# --------------------------------------------------------------------------class User(BaseModel):    username: str    hashed_password: str
# Create a "database" to hold your data. This is just for example purposes. In# a real world scenario you would likely connect to a SQL or NoSQL database.class DataBase(BaseModel):    user: List[User]
DB = DataBase(    user=[        # highlight-start        User(username="user1@gmail.com", hashed_password=crypto.hash("12345")),        User(username="user2@gmail.com", hashed_password=crypto.hash("12345")),        # highlight-end    ])

# highlight-startdef get_user(username: str) -> User:    user = [user for user in DB.user if user.username == username]    if user:        return user[0]    return None# highlight-end
Here is a quick example of what passlib hashed passwords look like:
from passlib.handlers.sha2_crypt import sha512_crypt as cryptocrypto.hash("12345")# '$6$rounds=656000$r8Ft1VUrj3.ewIXT$HDtwFY1QPOh82U0H/pZOlqbEIk6RjMyL.Z5sc0ub1Yp9Fnkv9ZlZZ.bk/TGBThBfLnV2.KbvuC/CBMr/1rEP1.'Step 2: Setup FastAPI
Nothing too fancy is happening here. As with any FastAPI app we initiate our FastAPI() app object. I will point out a few areas of interest:
settings: we create a settings object to store some settings information that will be accessed by different parts of our app. You do not need to do this using a class, but I chose to use a class as I think it is a clean way to organize the code.templates: To make a web app we need some way to build out a user interface. FastAPI comes with built in support for using Jinja. The linetemplates = Jinja2Templates(directory="templates")tells FastAPI where our template files are located.
from fastapi import FastAPIfrom fastapi.templating import Jinja2Templates# --------------------------------------------------------------------------# Setup FastAPI# --------------------------------------------------------------------------class Settings:    SECRET_KEY: str = "secret-key"    ALGORITHM = "HS256"    ACCESS_TOKEN_EXPIRE_MINUTES = 30  # in mins    COOKIE_NAME = "access_token"

app = FastAPI()templates = Jinja2Templates(directory="templates")settings = Settings()
Step 3: Authentication logic
To me, this is the most complex part of the app. Expand the code snippet below to see all of the details. In this section I will walk through some of the key parts in more detail below.
Expand to see the code snippets related to authentication 🔐
# --------------------------------------------------------------------------# Authentication logic# --------------------------------------------------------------------------class OAuth2PasswordBearerWithCookie(OAuth2):    """    This class is taken directly from FastAPI:    https://github.com/tiangolo/fastapi/blob/26f725d259c5dbe3654f221e608b14412c6b40da/fastapi/security/oauth2.py#L140-L171
    The only change made is that authentication is taken from a cookie    instead of from the header!    """    def __init__(        self,        tokenUrl: str,        scheme_name: Optional[str] = None,        scopes: Optional[Dict[str, str]] = None,        description: Optional[str] = None,        auto_error: bool = True,    ):        if not scopes:            scopes = {}        flows = OAuthFlowsModel(password={"tokenUrl": tokenUrl, "scopes": scopes})        super().__init__(            flows=flows,            scheme_name=scheme_name,            description=description,            auto_error=auto_error,        )
    async def __call__(self, request: Request) -> Optional[str]:        # IMPORTANT: this is the line that differs from FastAPI. Here we use        # `request.cookies.get(settings.COOKIE_NAME)` instead of        # `request.headers.get("Authorization")`        authorization: str = request.cookies.get(settings.COOKIE_NAME)        scheme, param = get_authorization_scheme_param(authorization)        if not authorization or scheme.lower() != "bearer":            if self.auto_error:                raise HTTPException(                    status_code=status.HTTP_401_UNAUTHORIZED,                    detail="Not authenticated",                    headers={"WWW-Authenticate": "Bearer"},                )            else:                return None        return param

oauth2_scheme = OAuth2PasswordBearerWithCookie(tokenUrl="token")

def create_access_token(data: Dict) -> str:    to_encode = data.copy()    expire = dt.datetime.utcnow() + dt.timedelta(minutes=settings.ACCESS_TOKEN_EXPIRE_MINUTES)    to_encode.update({"exp": expire})    encoded_jwt = jwt.encode(        to_encode,        settings.SECRET_KEY,        algorithm=settings.ALGORITHM    )    return encoded_jwt

def get_user(username: str) -> User:    user = [user for user in DB.user if user.username == username]    if user:        return user[0]    return None

def authenticate_user(username: str, plain_password: str) -> User:    user = get_user(username)    if not user:        return False    if not crypto.verify(plain_password, user.hashed_password):        return False    return user

def decode_token(token: str) -> User:    credentials_exception = HTTPException(        status_code=status.HTTP_401_UNAUTHORIZED,        detail="Could not validate credentials"    )    token = token.removeprefix("Bearer").strip()    try:        payload = jwt.decode(token, settings.SECRET_KEY, algorithms=[settings.ALGORITHM])        username: str = payload.get("username")        if username is None:            raise credentials_exception    except JWTError as e:        print(e)        raise credentials_exception
    user = get_user(username)    return user

def get_current_user_from_token(token: str = Depends(oauth2_scheme)) -> User:    """    Get the current user from the cookies in a request.
    Use this function when you want to lock down a route so that only    authenticated users can see access the route.    """    user = decode_token(token)    return user

def get_current_user_from_cookie(request: Request) -> User:    """    Get the current user from the cookies in a request.
    Use this function from inside other routes to get the current user. Good    for views that should work for both logged in, and not logged in users.    """    token = request.cookies.get(settings.COOKIE_NAME)    user = decode_token(token)    return user
OAuth2PasswordBearer
FastAPI comes with a class out of the box named OAuth2PasswordBearer (see FastAPI docs: Security - First Steps). This is useful for authenticating APIs. However, I could not figure out how to use it in the context of a web app.
In order to use a similar approach that works with web apps I made a small modification to FastAPIs implementation of OAuth2PasswordBearer. Instead of getting the authorization from the request header, we get it from the request cookie.
class OAuth2PasswordBearerWithCookie(OAuth2):    def __init__(        self,        tokenUrl: str,        scheme_name: Optional[str] = None,        scopes: Optional[Dict[str, str]] = None,        description: Optional[str] = None,        auto_error: bool = True,    ):        if not scopes:            scopes = {}        flows = OAuthFlowsModel(password={"tokenUrl": tokenUrl, "scopes": scopes})        super().__init__(            flows=flows,            scheme_name=scheme_name,            description=description,            auto_error=auto_error,        )

    async def __call__(self, request: Request) -> Optional[str]:        # highlight-start        authorization: str = request.cookies.get(settings.COOKIE_NAME)        # highlight-end        scheme, param = get_authorization_scheme_param(authorization)        if not authorization or scheme.lower() != "bearer":            if self.auto_error:                raise HTTPException(                    status_code=status.HTTP_401_UNAUTHORIZED,                    detail="Not authenticated",                    headers={"WWW-Authenticate": "Bearer"},                )            else:                return None        return param
class OAuth2PasswordBearer(OAuth2): def __init__( self, tokenUrl: str, scheme_name: Optional[str] = None, scopes: Optional[Dict[str, str]] = None, description: Optional[str] = None, auto_error: bool = True, ): if not scopes: scopes = {} flows = OAuthFlowsModel(password={"tokenUrl": tokenUrl, "scopes": scopes}) super().__init__( flows=flows, scheme_name=scheme_name, description=description, auto_error=auto_error, )
async def __call__(self, request: Request) -> Optional[str]: # highlight-start authorization: str = request.headers.get("Authorization") # highlight-end scheme, param = get_authorization_scheme_param(authorization) if not authorization or scheme.lower() != "bearer": if self.auto_error: raise HTTPException( status_code=HTTP_401_UNAUTHORIZED, detail="Not authenticated", headers={"WWW-Authenticate": "Bearer"}, ) else: return None return paramAfter defining our custom OAuth2PasswordBearerWithCookie we create an instance.
oauth2_scheme = OAuth2PasswordBearerWithCookie(tokenUrl="token")Access token
The access token is essentially how we will allow users to access protected web pages after authenticating. Just like in the FastAPI docs, I will use JWT tokens. Read more about them here: https://jwt.io. Our function create_access_token will be used to create a new JWT after a user has authenticated. The token will then be stored in the browser as a cookie (in a following code snippet).
import datetime as dtfrom jose import jwt
def create_access_token(data: Dict) -> str:    to_encode = data.copy()    expire = dt.datetime.utcnow() + dt.timedelta(minutes=settings.ACCESS_TOKEN_EXPIRE_MINUTES)    to_encode.update({"exp": expire})    encoded_jwt = jwt.encode(        to_encode,        settings.SECRET_KEY,        algorithm=settings.ALGORITHM    )    return encoded_jwt
Authenticating a user
We need a function that performs the actual user authentication when someone attempts to login. Our authenticate_user function will do two things:
- First it will check to see if the username exists in the database.
- If the username does exist, it will check to see that the passwords match. Since we have saved the hashed password in our database we need to hash the provided password using the same algorithm.
from passlib.handlers.sha2_crypt import sha512_crypt as crypto
def authenticate_user(username: str, plain_password: str) -> User:    user = get_user(username)    # highlight-start    if not user:        return False    if not crypto.verify(plain_password, user.hashed_password):        return False    # highlight-end    return user
Decoding the token
The above function authenticate_user is only called when a user first logs in. Our next function decode_token will be called to grant an already logged in user access to an endpoint. This function will decode the JWT so that we can get the required information from it. In our use cases, we need to decode the token so that we can figure out who the user is. There are a few key things to point out:
- We the line
token = token.removeprefix("Bearer").strip()removes the string “Bearer” from the start of token string. This will be necessary when we are calldecode_token()from within theget_current_user_from_cookie()function.
from fastapi import HTTPException, statusfrom jose import JWTError, jwt
def decode_token(token: str) -> User:    credentials_exception = HTTPException(        status_code=status.HTTP_401_UNAUTHORIZED,        detail="Could not validate credentials"    )    # highlight-start    token = token.removeprefix("Bearer").strip()    # highlight-end    try:        payload = jwt.decode(token, settings.SECRET_KEY, algorithms=[settings.ALGORITHM])        username: str = payload.get("username")        if username is None:            raise credentials_exception    except JWTError as e:        print(e)        raise credentials_exception
    user = get_user(username)    return user
Below is a little example that demonstrates how JWT encodes your information. The username is actually stored in your cookie. But, since it is encrypted it is not possible to know the actual username unless your key the secret key to decrypt the token.
from jose import jwt
data = {"username": "sam", "admin": True}encoded_jwt = jwt.encode(data, key="secret-key")print(encoded_jwt)# eyJhbGciOiJIUzI1NiIsInR5cCI6IkpXVCJ9.eyJ1c2VybmFtZSI6InNhbSIsImFkbWluIjp0cnVlfQ.gJbSlqbRTLm9LTCnvM9MMLDi2_Qqag1NM3m92oLZv9Idecoded_jwt = jwt.decode(encoded_jwt, key="secret-key")print(decoded_jwt)# {'username': 'sam', 'admin': True}You can see the cookies that are currently set in your browser using your
browser’s built in developer tools. 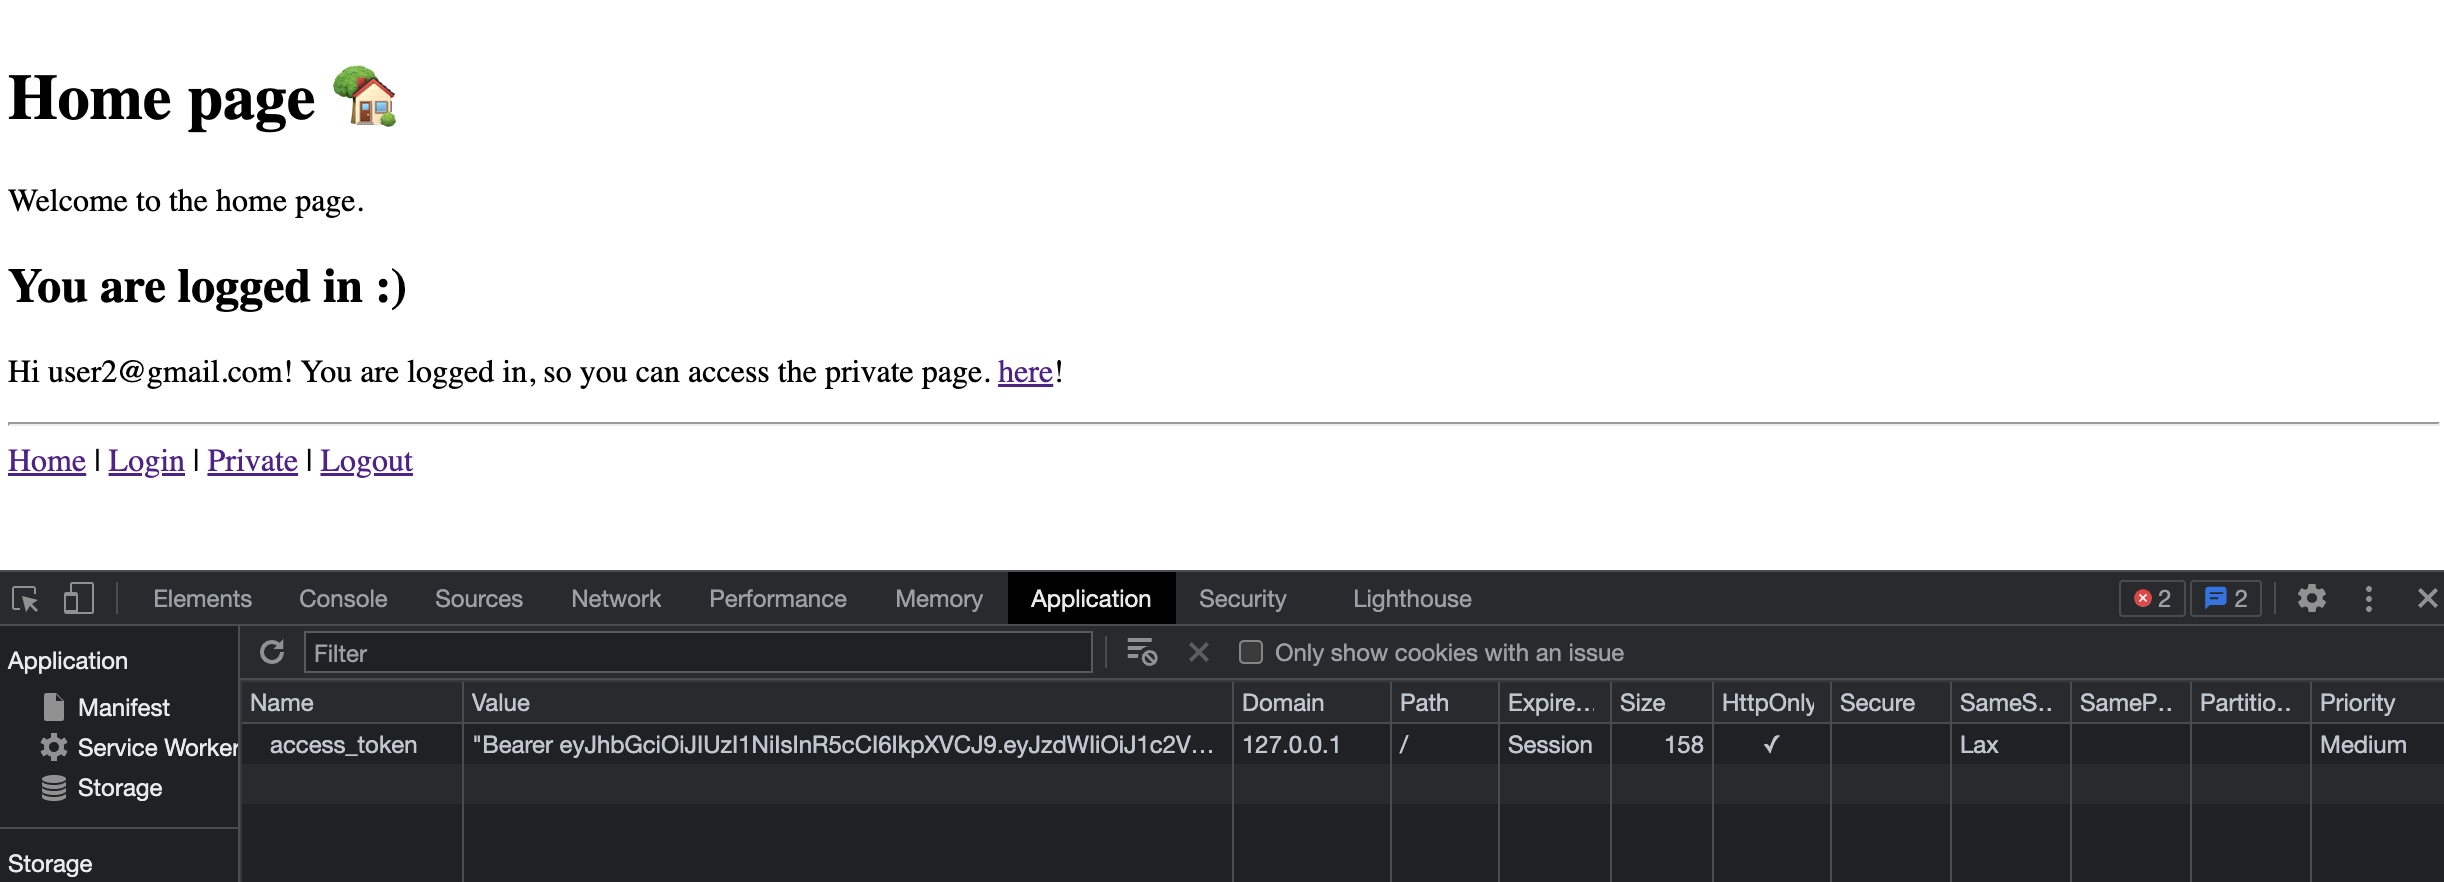
Getting the user from JWT
In order to not ask the user for a username and password on every request we need a way to securely remember that they have already been validated. In section Login for access token we will save our JWT token as a cookie. When decoded, that cookie contains the users username. If the token has a valid username, we will provide the user with access to the endpoint. To get a token, you need a username and password. So we can trust that if they have a token they have already authenticated.
The two functions below cover two different scenarios:
get_current_user_from_token: This function will be used when we want to protect an entire endpoint. For example see section Private page.get_current_user_from_cookie: This function will be used for endpoints that will be available to uses who have authenticated and those who have not. However, the behavior will be different based on if they have authenticated or not. For example see section Home page
from fastapi import Request

def get_current_user_from_token(token: str = Depends(oauth2_scheme)) -> User:    """    Get the current user from the cookies in a request.
    Use this function when you want to lock down a route so that only    authenticated users can see access the route.    """    user = decode_token(token)    return user

def get_current_user_from_cookie(request: Request) -> User:    """    Get the current user from the cookies in a request.
    Use this function from inside other routes to get the current user. Good    for views that should work for both logged in, and not logged in users.    """    token = request.cookies.get(settings.COOKIE_NAME)    user = decode_token(token)    return user
Login for access token
OK, this is finally the last function related to authentication logic 🔒! In this function (which is also an API endpoint) we will save the JWT token in the users browser as a cookie. Note that this is the bit of code where we actually call authenticate_user to validate that the password is correct. This endpoint will be called when the user submits their username and password using the login page.
@app.post("token")def login_for_access_token(    response: Response,    form_data: OAuth2PasswordRequestForm = Depends()) -> Dict[str, str]:    # highlight-start    user = authenticate_user(form_data.username, form_data.password)    # highlight-end    if not user:        raise HTTPException(status_code=status.HTTP_401_UNAUTHORIZED, detail="Incorrect username or password")    access_token = create_access_token(data={"username": user.username})
    # Set an HttpOnly cookie in the response. `httponly=True` prevents    # JavaScript from reading the cookie.    # highlight-start    response.set_cookie(        key=settings.COOKIE_NAME,        value=f"Bearer {access_token}",        httponly=True    )    # highlight-end    return {settings.COOKIE_NAME: access_token, "token_type": "bearer"}
Step 4: Views and HTML templates
If you made it this far, you are in the home stretch. All that is left is to define our views and HTML templates 🎉!
Home page
Our home page is actually pretty interesting. The content of the home page will be dynamic. If the user is logged in they will see one thing. If they are not logged in they will see something elses.
We achieve this in our API endpoint by attempting to get the current user from the cookie we set. If this function fails, it means the user is not logged in so we assign None to user.
from fastapi.responses import HTMLResponse
# --------------------------------------------------------------------------# Home Page# --------------------------------------------------------------------------@app.get("/", response_class=HTMLResponse)def index(request: Request): try: user = get_current_user_from_cookie(request) except: user = None context = { "user": user, "request": request, } return templates.TemplateResponse("index.html", context)<h1>Home page 🏡</h1>
<p>Welcome to the home page.</p>
{% if user %} <h2>You are logged in :)</h2> <p> Hi {{ user.username }}! You are logged in, so you can access the private page. <a href="/private">here</a>! </p>{% else %} <h2>You are NOT logged in :(</h2> <p> Hello stranger. You are not logged. Please follow the link to <a href="/auth/login" class="btn">login</a>! </p>{% endif %}
<hr>
{% include '_site_map.html' %}Then on the templating side we render different content based on if user is None or not:
Private page
Our private page is only accessible to users who have logged in. Unlike our home page, we do not need any conditional logic here.
How do we achieve this? They key is our use of Depends in the function definition. If we use user: User = Depends(get_current_user_from_token)) on any endpoint, that endpoint will only be accessible to users who have logged in.
from fastapi import Dependsfrom fastapi.responses import HTMLResponse
# --------------------------------------------------------------------------# Private Page# --------------------------------------------------------------------------# A private page that only logged in users can access.@app.get("/private", response_class=HTMLResponse)# highlight-startdef index(request: Request, user: User = Depends(get_current_user_from_token)):# highlight-end context = { "user": user, "request": request } return templates.TemplateResponse("private.html", context)<h1>Private Page 🕵️</h1>
<p>Hello {{ user.username }}!</p>
<p>Welcome to this private page. You can only see if you are logged in!</p>
<hr>
{% include '_site_map.html' %}Login page - GET
Our login page is very simple. It is accessible to everyone, and there is no conditional logic. When you hit the “submit” button of the login form it will send a post request to /auth/login.
from fastapi.responses import HTMLResponse
# --------------------------------------------------------------------------# Login - GET# --------------------------------------------------------------------------@app.get("/auth/login", response_class=HTMLResponse)def login_get(request: Request): context = { "request": request, } return templates.TemplateResponse("login.html", context)<h1>Login 🫥</h1>
{% for error in errors %} <p style="color: red">{{ error }}</p>{% endfor %}<form action="/auth/login" method="post"> <p> <p><label for="">Email</label></p> <input type="email" name="username" value="{{ username }}" required> </p> <p> <p><label for="">Password</label></p> <input type="password" name="password" value="{{ password }}" required> </p> <input type="submit" value="Submit"></form>
<hr>
{% include '_site_map.html' %}Login page - POST
The “post” side of logging in is a bit more complicated. There are a few things happening here:
- We create a class
LoginFormto handle the logic of validating the form data. In the event that the submitted form data is not valid we will re-render the “templates/login.html” with the same form data and an error message. - In the event that the form is valid, we will attempt to validate the users credentials. The line
login_for_access_token(response=response, form_data=form)will attempt to log the user in, and if successful set a cookie with the users data encoded. - Notice that we we validate the form our response is
response = RedirectResponse("/", status.HTTP_302_FOUND). This will redirect our user to the home page. It is important that you includestatus.HTTP_302_FOUND. If you do not, FastAPI will send a post request against"/". We have not defined a post request endpoint for"/". By usingstatus.HTTP_302_FOUNDFastAPI knows to send a get request (this part was tricky and took me a lot of googling to figure out 🕵️).
from fastapi import Requestfrom fastapi.responses import HTMLResponse, RedirectResponse
# --------------------------------------------------------------------------# Login - POST# --------------------------------------------------------------------------class LoginForm:    def __init__(self, request: Request):        self.request: Request = request        self.errors: List = []        self.username: Optional[str] = None        self.password: Optional[str] = None
    async def load_data(self):        form = await self.request.form()        self.username = form.get("username")        self.password = form.get("password")
    async def is_valid(self):        if not self.username or not (self.username.__contains__("@")):            self.errors.append("Email is required")        if not self.password or not len(self.password) >= 4:            self.errors.append("A valid password is required")        if not self.errors:            return True        return False

@app.post("/auth/login", response_class=HTMLResponse)async def login_post(request: Request): form = LoginForm(request) await form.load_data() if await form.is_valid(): try: response = RedirectResponse("/", status.HTTP_302_FOUND) login_for_access_token(response=response, form_data=form) form.__dict__.update(msg="Login Successful!") console.log("[green]Login successful!!!!") return response except HTTPException: form.__dict__.update(msg="") form.__dict__.get("errors").append("Incorrect Email or Password") return templates.TemplateResponse("login.html", form.__dict__) return templates.TemplateResponse("login.html", form.__dict__)<h1>Login 🫥</h1>
{% for error in errors %} <p style="color: red">{{ error }}</p>{% endfor %}<form action="/auth/login" method="post"> <p> <p><label for="">Email</label></p> <input type="email" name="username" value="{{ username }}" required> </p> <p> <p><label for="">Password</label></p> <input type="password" name="password" value="{{ password }}" required> </p> <input type="submit" value="Submit"></form>
<hr>
{% include '_site_map.html' %}Logout endpoint
The final feature our web app is the ability to logout. There is no logout view, instead we only have a logout endpoint. In the site map we include a link to call the logout endpoint. The logic of logging out is pretty simple:
- Delete the cookie containing the encoded user information.
- Redirect the user to the home page.
from fastapi.responses import HTMLResponse, RedirectResponse
# --------------------------------------------------------------------------# Logout# --------------------------------------------------------------------------@app.get("/auth/logout", response_class=HTMLResponse)def login_get(): response = RedirectResponse(url="/") response.delete_cookie(settings.COOKIE_NAME) return response<!--This code snippet will appear in each file, so to avoid re-writing it we defineit only once here.-->
<a href="/">Home</a> |<a href="/auth/login">Login</a> |<a href="/private">Private</a> |<a href="/auth/logout">Logout</a>Wrap up
Congratulations 🎉! Your web app is complete and ready to go. Check out the complete source code on GitHub: https://github.com/SamEdwardes/personal-blog/tree/main/blog/2022-04-14-fastapi-webapp-with-auth>. If you have any questions or feedback find me on twitter @TheReaLSamlam, or submit an issue on GitHub: https://github.com/SamEdwardes/personal-blog/issues/new/choose.
Reference
Here are some of the resources I found useful while researching this blog post:
- https://fastapi.tiangolo.com/tutorial/security/
- https://www.fastapitutorial.com/blog/authentication-in-fastapi/
- https://github.com/talkpython/web-applications-with-fastapi-course
- https://stackoverflow.com/questions/62119138/how-to-do-a-post-redirect-get-prg-in-fastapi
- https://github.com/MushroomMaula/fastapi_login
- https://github.com/mjhea0/awesome-fastapi
- https://kernelpanic.io/demystifying-authentication-with-fastapi-and-a-frontend
- https://github.com/nofoobar/JobBoard-Fastapi/tree/0e1bdf676a66e3f341d00c590b3fd07b269488f4